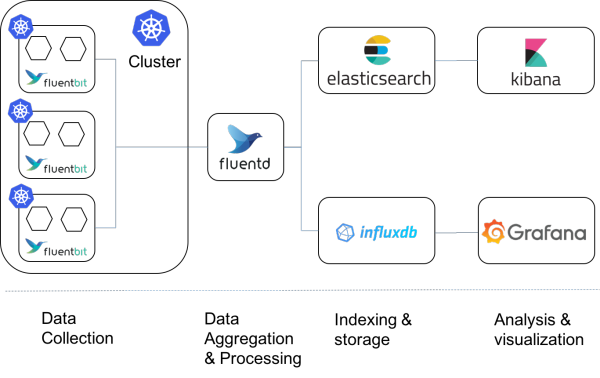
Fluentd 日志收集
官网地址:
https://www.fluentd.org/
下载地址:
https://www.fluentd.org/download
Fluentd文档地址:
https://docs.fluentd.org/installation
Fluentd Bit文档地址:
https://docs.fluentbit.io/manual/
Fluentd 和 Fluent Bit:
Fluentd 和 Fluent Bit 的区别在于Fluent Bit 适用于对资源需求非常敏感的情况下且没有依赖,更节省资源只要450KB的内存就可运行,缺点是插件少,只负责收集和转发。Fluentd 内存需求约为40M,拥有更丰富的插件,支持大吞吐量,多输入并路由到不同的输出。
可以查考部署的yaml文件:
fluentd-es-ds.yaml
https://github.com/kubernetes/kubernetes/blob/master/cluster/addons/fluentd-elasticsearch/fluentd-es-ds.yaml
fluent-bit-ds.yaml
https://github.com/fluent/fluent-bit-kubernetes-logging/blob/0.13-dev/output/kafka/fluent-bit-ds.yaml
安装前配置:
文件描述符:
cat >> /etc/security/limits <<EOF
root soft nofile 65536
root hard nofile 65536
* soft nofile 65536
* hard nofile 65536
EOF
查看:
ulimit -n
sysctl.conf
cat >> /etc/sysctl.conf <<EOF
vm.max_map_count=655360
EOF
查看:
sysctl -p
安装Fluentd:
导入gpg key:
rpm --import https://packages.treasuredata.com/GPG-KEY-td-agent
配置yum源:
cat > /etc/yum.repos.d/td.repo <<EOF
[treasuredata]
name=TreasureData
baseurl=http://packages.treasuredata.com/3/redhat/\$releasever/\$basearch
gpgcheck=1
gpgkey=https://packages.treasuredata.com/GPG-KEY-td-agent
EOF
安装:
yum install -y td-agent
启动:
systemctl start td-agent.service
测试:
curl -X POST -d 'json={"json":"message"}' http://localhost:8888/debug.test

tail -f /var/log/td-agent/td-agent.log
配置:
source:定义输入,数据的来源,input方向。
match:定义输出,下一步的去向,如写入文件,或者发送到指定软件存储。output方向。
filter:定义过滤,也即事件处理流水线,一般在输入和输出之间运行,可减少字段,也可丰富信息。
system:系统级别的设置,如日志级别、进程名称。
label:定义一组操作,从而实现复用和内部路由。
@include:引入其他文件,和Java、python的import类似。
输出调试:
<source>
  @type tail
  path /var/log/nginx/access.log
  pos_file /var/log/td-agent/nginx-access.log.pos
  tag nginx.access
  format nginx
</source>

<match nginx.access>
  @type stdout
</match>
收集nginx日志配置:
<source>
  @type tail
  path /var/log/nginx/access.log #...or where you placed your Apache access log
  pos_file /var/log/td-agent/nginx-access.log.pos # This is where you record file position
  tag nginx.access
  format nginx
</source>
<source>
  @type tail
  path /var/log/nginx/error.log
  pos_file /var/log/td-agent/nginx-error.log.pos
  tag nginx.error
  format /^(?<time>[^ ]+ [^ ]+) \[(?<log_level>.*)\] (?<pid>\d*).(?<tid>[^:]*): (?<message>.*)$/
</source>

<match nginx.*>
 @type elasticsearch
 logstash_format true
 host 172.31.18.133 # elasticsearch IP
 port 9200
 index_name fluentd-nginx
 type_name fluentd-nginx
</match>
检查配置文件:
td-agent --dry-run -c td-agent.conf
tag
tag的用作:Fluentd 内部路由引擎的方向。
tag的使用:<match tag>、<filter tag>,如:<match nginx.web>、<filter nginx.*>
语法:
*:匹配单个 tag 部分
例:a.*,匹配 a.b,但不匹配 a 或者 a.b.c
**:匹配 0 或 多个 tag 部分
例:a.**,匹配 a、a.b 和 a.b.c
{X,Y,Z}:匹配 X、Y 或 Z,其中 X、Y 和 Z 是匹配模式。可以和 * 和 ** 模式组合使用
例 1:{a, b},匹配 a 和 b,但不匹配 c
例 2:a.{b,c}. 和 a.{b,c.*}
多模式:当多个模式列在一个 <match> 标签(由一个或多个空格分隔)内时,它匹配任何列出的模式。
例如:
<match a b>:匹配 a 和 b
<match a.** b.*>:匹配 a、a.b、a.b.c 和 b.d
过滤插件
record_transformer:
将收集来的信息通过增删改的方式来处理,也就是说这个插件可以将收集来的信息往里面增加字段、删除字段、修改字段。这个插件内核中自带不用安装。
增加字段:下面这段配置中向原有的字段中增加了hostname 和 tag 两个字段。
<filter foo.bar>
  @type record_transformer
  <record>
    hostname "#{Socket.gethostname}" # ruby的语法
    tag ${tag}
  </record>
</filter>
由:
{"message":"hello world!"}变为:
{"message":"hello world!", "hostname":"db001.internal.example.com", "tag":"foo.bar"}用法二:可在配置里面搞点计算,使用Ruby的语法。
<filter foo.bar>
  @type record_transformer
  enable_ruby
  <record>
    avg ${record["total"] / record["count"]}
  </record>
</filter>
由:
{"total":100, "count":10}变为:
{"total":100, "count":10, "avg":"10"}用法三:将tag中的第二部分值加入字段中。
<filter web.*> # *号匹配到的值
  @type record_transformer
  <record>
    service_name ${tag_parts[1]}  # 将*号匹配到的值放在这个字段中
  </record>
</filter>
由:
{"user_id":1, "status":"ok"}变为:
{"user_id":1, "status":"ok", "service_name":"auth"}基本使用语法:
如果输入的记录为:{"total":100, "count":10}
我们可以在<record>标签里面使用 record["total"]=100,record["count"]=10 来取值。还有其他的值time、hostname等。
<record>
field: ${record["total"] / record["count"]}
tag: ${tag}
hostname "#{Socket.gethostname}"
</record>
<record>里面的键值必须是新的字段。
标签tag的用法:
tag_parts[N] 标签的第N部分
tag_prefix[N] 从开始到N的部分
tag_suffix[N] 从N到结尾的部分
例:标签为 debug.my.app
tag_prefix[0] = debug
tag_prefix[1] = debug.my
tag_prefix[2] = debug.my.app
tag_suffix[0] = debug.my.app
tag_suffix[1] = my.app
tag_suffix[2] = app
其他参数:record是在filter指令内的
<record>
    enable_ruby    false
    auto_typecast    false
    renew_record    false
    renew_time_key    nil
    keep_keys    nil
    remove_keys    nil
</record>
parser:
解析器,解析日志,将日志格式化成json。
<filter foo.bar>
  @type parser
  key_name log
  <parse>
    @type regexp
    expression /^(?<host>[^ ]*) [^ ]* (?<user>[^ ]*) \[(?<time>[^\]]*)\] "(?<method>\S+)(?: +(?<path>[^ ]*) +\S*)?" (?<code>[^ ]*) (?<size>[^ ]*)$/
    time_format %d/%b/%Y:%H:%M:%S %z
  </parse>
</filter>
由:
time:
injested time (depends on your input)
record:
{"log":"192.168.0.1 - - [05/Feb/2018:12:00:00 +0900] \"GET / HTTP/1.1\" 200 777"}
解析为:
time
05/Feb/2018:12:00:00 +0900
record:
{"host":"192.168.0.1","user":"-","method":"GET","path":"/","code":"200","size":"777"}
在<filter>中的可用参数:详见 https://docs.fluentd.org/filter/parser