windows maven 安装
来源:原创
时间:2019-10-12
作者:脚本小站
分类:其他
下载地址:
http://maven.apache.org/download.cgi
阿里云下载地址:
https://mirrors.aliyun.com/apache/maven/maven-3/
安装:
首先安装jdk,安装tomcat,将maven解压到任意目录,并配置环境变量,maven需要JAVA_HOME变量,安装jdk的时候要配置。
MAVEN_HOME=D:\apache-maven-3.6.2
Path追加如下变量:
%MAVEN_HOME%\bin
查看版本:
mvn -version
设置maven的本地仓库:
配置文件如下:
D:\apache-maven-3.6.2\conf\settings.xml
配置如下:找到 localRepository 写上目录位置即可
<localRepository>D:\apache-maven-3.6.2\repository</localRepository>
远程仓库位置:在<mirrors>标签下加入
<mirror>
    <id>alimaven</id>
    <name>aliyun maven</name>
    <url>http://maven.aliyun.com/nexus/content/groups/public/</url>
    <mirrorOf>central</mirrorOf>
</mirror>
Eclipse中设置
切换或设置jdk:
Window -> Preferences

在eclipse中设置maven的配置文件:
选择maven的配置文件:maven的配置文件。
菜单 Window -> Preferences -> 搜索maven -> User Settings -> 选择maven的配置文件。

设置maven位置:installatiions -> add -> apply

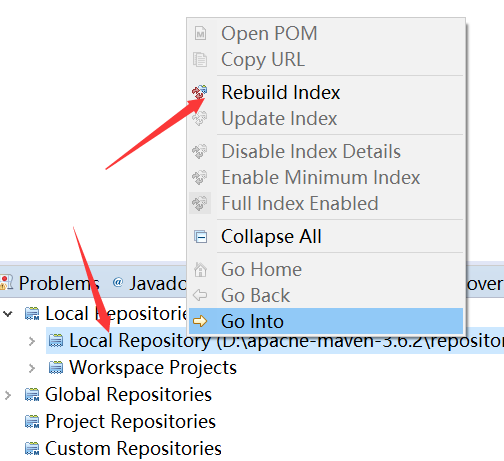
重建索引:


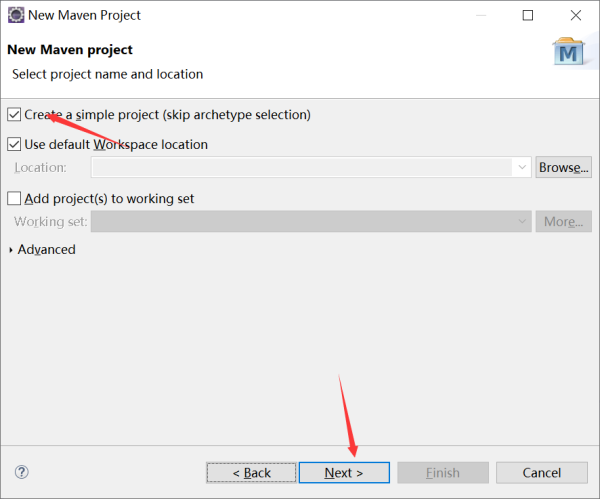
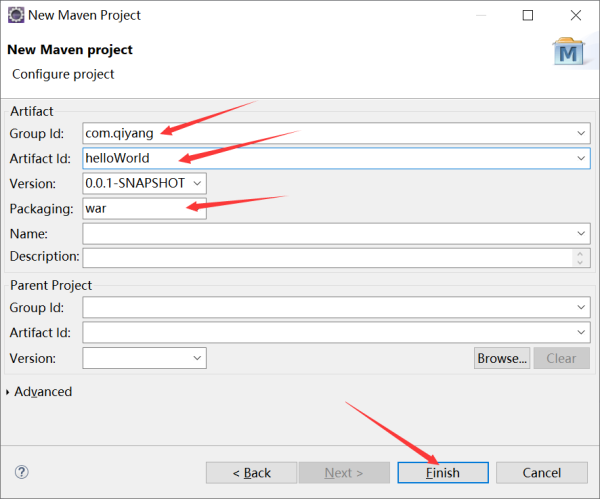
Eclipse中新建maven项目:


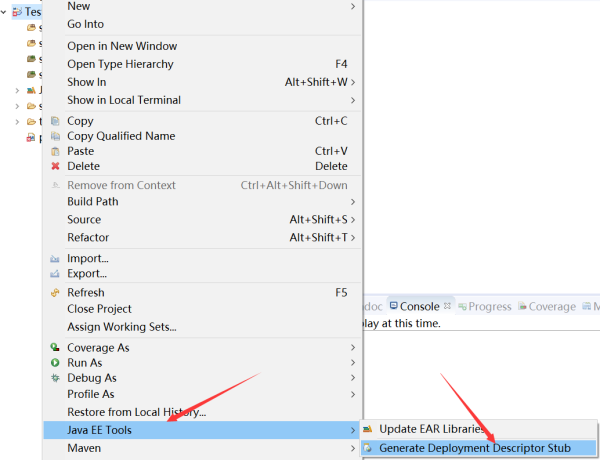
创建WEB-INF和web.xml:

自动生成web.xml
web.xml内容如下:
<?xml version="1.0" encoding="UTF-8"?>
<web-app xmlns:xsi="http://www.w3.org/2001/XMLSchema-instance" xmlns="http://java.sun.com/xml/ns/javaee" xsi:schemaLocation="http://java.sun.com/xml/ns/javaee http://java.sun.com/xml/ns/javaee/web-app_3_0.xsd" id="WebApp_ID" version="3.0">
  <display-name>helloWorld</display-name>
  <welcome-file-list>
    <welcome-file>index.html</welcome-file>
    <welcome-file>index.htm</welcome-file>
    <welcome-file>index.jsp</welcome-file>
    <welcome-file>default.html</welcome-file>
    <welcome-file>default.htm</welcome-file>
    <welcome-file>default.jsp</welcome-file>
  </welcome-file-list>
  <!--
  <servlet>
  	<display-name>HelloMaven</display-name>
  	<servlet-name>HelloMaven</servlet-name>
  	<servlet-class>com.qiyang.servlet.HelloMaven</servlet-class>
  </servlet>
  <servlet-mapping>
  	<servlet-name>HelloMaven</servlet-name>
  	<url-pattern>/HelloMaven</url-pattern>
  </servlet-mapping>
   -->
</web-app>
pom.xml文件内容如下:
<project xmlns="http://maven.apache.org/POM/4.0.0" xmlns:xsi="http://www.w3.org/2001/XMLSchema-instance"
  xsi:schemaLocation="http://maven.apache.org/POM/4.0.0 http://maven.apache.org/maven-v4_0_0.xsd">
  <modelVersion>4.0.0</modelVersion>
  <groupId>com.qiyang</groupId>
  <artifactId>Test</artifactId>
  <packaging>war</packaging>
  <version>0.0.1-SNAPSHOT</version>
  <name>Test Maven Webapp</name>
  <url>http://maven.apache.org</url>
  <dependencies>
    <dependency>
      <groupId>junit</groupId>
      <artifactId>junit</artifactId>
      <version>3.8.1</version>
      <scope>test</scope>
    </dependency>
    <dependency>
    	<groupId>javax.servlet</groupId>
    	<artifactId>javax.servlet-api</artifactId>
    	<version>3.1.0</version>
    	<scope>provided</scope>
    </dependency>
  </dependencies>
  <build>
    <finalName>Test</finalName>
    <plugins>
    	<plugin>
    		<groupId>org.apache.maven.plugins</groupId>
    		<artifactId>maven-compiler-plugin</artifactId>
    		<version>3.5.1</version>
	        <configuration>
	          <source>1.8</source>
	          <target>1.8</target>
	          <encoding>UTF-8</encoding>
	        </configuration>
    	</plugin>
    	<plugin>
    		<groupId>org.apache.maven.plugins</groupId>
    		<artifactId>maven-compiler-plugin</artifactId>
    		<version>3.5.1</version>
    	</plugin>
    	<plugin>
    		<groupId>org.apache.tomcat.maven</groupId>
    		<artifactId>tomcat7-maven-plugin</artifactId>
    		<configuration>
    			<path>/</path>
    			<port>8080</port>
    		</configuration>
    	</plugin>
    </plugins>
  </build>
</project>
更新项目:项目右键->Maven->Update Project


创建Servlet:


添加依赖:

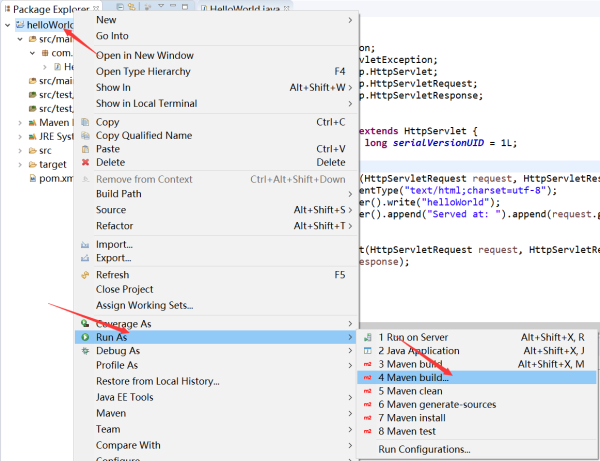
添加插件:右键->Maven


默认是tomcat6,可以使用 tomcat7:run,插件也要改成tomcat7-maven-plugin


详细设置:
https://blog.csdn.net/kshon/article/details/85393630