openvpn安装
安装openvpn服务
安装openvpn:
yum install -y openssl lzo pam openssl-devel lzo-devel pam-devel easy-rsa openvpn
创建证书:
cp -rf /usr/share/easy-rsa/3.0.8/ /etc/openvpn/server/easy-rsa
cd /etc/openvpn/server/easy-rsa/

cat << EOF >> /etc/openvpn/server/easy-rsa/vars
# 国家
set_var EASYRSA_REQ_COUNTRY     "CN"
# 省
set_var EASYRSA_REQ_PROVINCE    "BJ"
# 城市
set_var EASYRSA_REQ_CITY        "BeiJing"
# 组织
set_var EASYRSA_REQ_ORG         "openvpn"
# 邮箱
set_var EASYRSA_REQ_EMAIL       "email@email.com"
# 拥有者
set_var EASYRSA_REQ_OU          "openvpn"
# 长度
set_var EASYRSA_KEY_SIZE        2048
# 算法
set_var EASYRSA_ALGO            rsa
# CA证书过期时间,单位天
set_var EASYRSA_CA_EXPIRE      36500
# 签发证书的有效期是多少天,单位天
set_var EASYRSA_CERT_EXPIRE    36500
EOF

./easyrsa init-pki
./easyrsa build-ca nopass
./easyrsa build-server-full server nopass
./easyrsa gen-dh
openvpn --genkey --secret ta.key
创建一些目录:
mkdir -p /var/log/openvpn/
mkdir -p /etc/openvpn/server/user
chown -R openvpn:openvpn /var/log/openvpn
账号密码认证登陆
服务端配置:
cat > /etc/openvpn/server/server.conf <<EOF
port 55555
proto tcp
dev tun
user openvpn
group openvpn

ca /etc/openvpn/server/easy-rsa/pki/ca.crt
# 服务端的证书验证服务器身份,客户端的证书验证客户端的身份
cert /etc/openvpn/server/easy-rsa/pki/issued/server.crt
key /etc/openvpn/server/easy-rsa/pki/private/server.key

# 在连接中协商加密的密钥
dh /etc/openvpn/server/easy-rsa/pki/dh.pem

# 预共享秘钥(对称秘钥)用于加密数据流,客户端为1,服务器端为0,防止DOS攻击
# 可以配置该项,也可以不配置
tls-auth /etc/openvpn/server/easy-rsa/ta.key 0

#配置账号密码的认证方式
auth-user-pass-verify /etc/openvpn/server/user/checkpsw.sh via-env
script-security 3

# 不验证客户端证书
verify-client-cert none
# 使用用户名作为证书的CN字段
username-as-common-name
# 允许客户端之间直接通信
client-to-client
# 允许使用相同CN的用户来连接服务器(允许同一个用户多个客户端登陆)
duplicate-cn

#openvpn的虚拟网段,用来分配给客户端
server 10.8.0.0 255.255.0.0

#this line will redirect all traffic through our OpenVPN
# 重定向客户端的所有流量,否则访问服务端内网要配置路由
push "redirect-gateway def1"

# 推送给客户端的DNS解析地址
push "dhcp-option DNS 223.5.5.5"
push "dhcp-option DNS 114.114.114.114"

# 推送给客户端的路由配置,配置了redirect-gateway就不用配置下面的路由了
;push "route 192.168.1.0 255.255.255.0"
;push "route 192.168.2.0 255.255.255.0"

cipher AES-256-CBC
keepalive 10 120

# 持久化连接会话的选项,重新读取密钥文件/接口时不退出或重启
persist-key
persist-tun

# 自动重连,0表示不自动重连
reneg-sec 0

# 日志级别
verb 3
log /var/log/openvpn/server.log
log-append /var/log/openvpn/server.log
status /var/log/openvpn/status.log
EOF
密码文件:
echo 'mytest mytestpass' >> /etc/openvpn/server/user/psw-file
chmod 600 /etc/openvpn/server/user/psw-file
chown openvpn:openvpn /etc/openvpn/server/user/psw-file
创建检查密码脚本:
cat > /etc/openvpn/server/user/checkpsw.sh <<EOF
#!/bin/sh

PASSFILE="/etc/openvpn/server/user/psw-file"
LOG_FILE="/var/log/openvpn/password.log"
TIME_STAMP=`date "+%Y-%m-%d %T"`

if [ ! -r "${PASSFILE}" ]; then
  echo "${TIME_STAMP}: Could not open password file \"${PASSFILE}\" for reading." >>  ${LOG_FILE}
  exit 1
fi
CORRECT_PASSWORD=`awk '!/^;/&&!/^#/&&$1=="'${username}'"{print $2;exit}' ${PASSFILE}`
if [ "${CORRECT_PASSWORD}" = "" ]; then
  echo "${TIME_STAMP}: User does not exist: username=\"${username}\", password=
\"${password}\"." >> ${LOG_FILE}
  exit 1
fi
if [ "${password}" = "${CORRECT_PASSWORD}" ]; then
  echo "${TIME_STAMP}: Successful authentication: username=\"${username}\"." >> ${LOG_FILE}
  exit 0
fi
echo "${TIME_STAMP}: Incorrect password: username=\"${username}\", password=
\"${password}\"." >> ${LOG_FILE}
exit 1
EOF
修改权限数组:
chmod 700 /etc/openvpn/server/user/checkpsw.sh
chown openvpn:openvpn /etc/openvpn/server/user/checkpsw.sh
添加iptables规则:
iptables -t nat -A POSTROUTING -s 10.8.0.0/24 -o eth0 -j MASQUERADE
开机自动添加iptables规则:
chmod +x /etc/rc.d/rc.local
echo "iptables-restore < /root/iptables" >> /etc/rc.d/rc.local
开启ipv4转发:
临时修改:
echo 1 > /proc/sys/net/ipv4/ip_forward
永久修改:
cat >> /etc/sysctl.conf <<EOF
net.ipv4.ip_forward = 1
EOF

sysctl -p
启动服务:
cd /etc/openvpn/server/
ln -sv server.conf .service.conf
systemctl start openvpn-server@.service.service && systemctl status openvpn-server@.service.service
启动服务:
nohup openvpn /etc/openvpn/server/server.conf &
客户端配置:需要将 ca.crt、和 ta.key文件下载到本地配置,并创建 client.ovpn内容如下。
client
proto tcp
dev tun
auth-user-pass
remote your.domain.com 55555 # openvpn服务器地址和端口
ca ca.crt
tls-auth ta.key 1
remote-cert-tls server
cipher AES-256-CBC
auth-nocache
persist-tun
persist-key
verb 3
mute 10
# reneg-sec 0 # 默认值3600,一个小时进行一次TSL重新协商,会重连,0表示禁用TSL重协商
# auth-user-pass pass.txt # 账号和密码,没有该项启动时会有输入框提示输入账号密码
pass.txt
username # 第一行账号
password # 第二行密码
证书认证登陆
这种方法需要创建客户端证书,一个用户对应一个客户端证书,用户配置自己的证书即可连接服务端。
创建证书吊销列表:相比账号密码方式,证书认证方式需要给不需要的账号吊销证书,所以需要配置吊销列表让openvpn知道那些证书是被吊销的。
./easyrsa gen-crl
服务端配置:
cat > /etc/openvpn/server/server.conf <<EOF
port 55555
proto tcp
dev tun

ca /etc/openvpn/server/easy-rsa/pki/ca.crt
cert /etc/openvpn/server/easy-rsa/pki/issued/server.crt
key /etc/openvpn/server/easy-rsa/pki/private/server.key
dh /etc/openvpn/server/easy-rsa/pki/dh.pem
# 证书吊销列表
crl-verify /etc/openvpn/server/easy-rsa/pki/crl.pem

server 10.8.0.0 255.255.255.0
push "redirect-gateway def1"
# push "route 192.168.0.0 255.255.255.0"

keepalive 10 120
cipher AES-256-CBC
ncp-ciphers AES-128-GCM:AES-256-CBC

max-clients 100
user openvpn
group openvpn

log /var/log/openvpn/server.log
log-append /var/log/openvpn/server.log
status /var/log/openvpn/status.log
verb 3
mute 20
EOF
客户端证书创建:
./easyrsa build-client-full user1 nopass    # 无密码,(这个密码是加在证书上的,可加可不加)
./easyrsa build-client-full zhangsan    # 让你输入密码,连接时会提示输入密码
添加iptables规则:
iptables -t nat -A POSTROUTING -s 10.8.0.0/24 -o eth0 -j MASQUERADE
开机自动添加iptables规则:
chmod +x /etc/rc.d/rc.local
echo "iptables-restore < /root/iptables" >> /etc/rc.d/rc.local
开启ipv4转发:
cat >> /etc/sysctl.conf <<EOF
net.ipv4.ip_forward = 1
EOF
sysctl -p
客户端配置文件:
client
dev tun
proto tcp
remote your.domain.com 55555
resolv-retry infinite
nobind
ca ca.crt
cert zhangsan.crt
key zhangsan.key
remote-cert-tls server
cipher AES-256-CBC
ncp-ciphers AES-128-GCM:AES-256-CBC
auth-nocache
verb 3
吊销证书:不需要的客户端证书可以吊销。
./easyrsa revoke certname
吊销后的证书登陆时报错如下:
VERIFY ERROR: depth=0, error=certificate revoked
合并配置文件
可以将证书和配置合成一个文件:
ca       [inline]
cert     [inline]
key      [inline]
tls-auth [inline] 1

<ca>
-----BEGIN CERTIFICATE-----
# insert base64 blob from ca.crt
-----END CERTIFICATE-----
</ca>

<cert>
-----BEGIN CERTIFICATE-----
# insert base64 blob from client1.crt
-----END CERTIFICATE-----
</cert>

<key>
-----BEGIN PRIVATE KEY-----
# insert base64 blob from client1.key
-----END PRIVATE KEY-----
</key>

<tls-auth>
-----BEGIN OpenVPN Static key V1-----
# insert ta.key
-----END OpenVPN Static key V1-----
</tls-auth>
快速获取配置脚本:
#!/bin/bash

NAME=$1

if [ -z $NAME ]; then
    echo "$0 openvpnUsername"
    exit;
fi

mkdir ./${NAME}/{pc,phone} -pv
cd /etc/openvpn/server/easy-rsa/
./easyrsa build-client-full ${NAME} nopass

if [ $? -ne 0 ]; then
    exit;
fi

cd /root/bin/
cp /etc/openvpn/server/easy-rsa/pki/issued/${NAME}.crt ./${NAME}/phone/
cp /etc/openvpn/server/easy-rsa/pki/private/${NAME}.key ./${NAME}/phone/
cp /etc/openvpn/server/easy-rsa/pki/ca.crt ./${NAME}/phone/

PCDIR=./${NAME}/pc
PC_CONFIG=${PCDIR}/${NAME}-pc.ovpn
sed -n '/-----BEGIN CERTIFICATE-----/,/-----END CERTIFICATE-----/p' ${NAME}/phone/${NAME}.crt > ${PCDIR}/certtemp.txt

cat >> ${NAME}/phone/${NAME}.ovpn <<EOF
client
dev tun
proto tcp
remote 123.123.123.123 55555
resolv-retry infinite
nobind
ca ca.crt
cert ${NAME}.crt
key ${NAME}.key
remote-cert-tls server
cipher AES-256-CBC
ncp-ciphers AES-128-GCM:AES-256-CBC
auth-nocache
verb 3
EOF

cat >> $PC_CONFIG <<EOF
client
dev tun
proto tcp
remote 123.123.123.123 55555
resolv-retry infinite
nobind
ca [inline]
cert [inline]
key [inline]
remote-cert-tls server
cipher AES-256-CBC
ncp-ciphers AES-128-GCM:AES-256-CBC
auth-nocache
verb 3
EOF

echo "<ca>" >> $PC_CONFIG
cat ${NAME}/phone/ca.crt >> $PC_CONFIG
echo "</ca>" >> $PC_CONFIG

echo "<cert>" >> $PC_CONFIG
cat ${PCDIR}/certtemp.txt >> $PC_CONFIG
echo "</cert>" >> $PC_CONFIG

echo "<key>" >> $PC_CONFIG
cat ${NAME}/phone/${NAME}.key >> $PC_CONFIG
echo "</key>" >> $PC_CONFIG

rm ${PCDIR}/certtemp.txt -rf
tree ${NAME}
openvpn客户端
win客户端:
https://www.techspot.com/downloads/5182-openvpn.html
官方配置文件参考:
https://github.com/OpenVPN/openvpn/blob/master/sample/sample-config-files/server.conf
参考文章:
jianshu.com/p/637b4123fc92
howtoing.com/how-to-install-openvpn-on-centos-7
证书创建:
junjie2018.github.io/notes/%E6%8A%80%E6%9C%AF%E7%A0%94%E7%A9%B6/%E4%BD%9C%E5%BA%9F/openvpn/openvpn%E8%AF%81%E4%B9%A6%E7%94%9F%E6%88%90/
linux客户端:
yum install -y openvpn
用到的证书:
ls /etc/openvpn/client
ca.crt
ta.key
配置文件:
vim /etc/openvpn/client/client1.conf

client
proto tcp
dev tun
auth-user-pass
remote your.domain.com 55555
ca /etc/openvpn/client/ca.crt
tls-auth /etc/openvpn/client/ta.key 1
remote-cert-tls server
cipher AES-256-CBC
auth-nocache
persist-tun
persist-key
verb 3
mute 10
reneg-sec 0
启动:openvpn-client@配置文件名.service
systemctl start openvpn-client@client1.service && systemctl status openvpn-client@client1.service
格式:
systemctl start openvpn-client@配置文件名.service && systemctl status openvpn-client@配置文件名.service
easyrsa证书工具的使用
子命令:
init-pki:初始化PKI (Public Key Infrastructure),用于创建证书颁发机构及其相关信息,包括公钥、私钥等。
build-ca [ cmd-opts ]:建立证书颁发机构(CA),生成根证书(ca.crt)和私钥(ca.key),并存储到pki目录中。该命令会提示用户输入一些信息以用于生成根证书。

gen-dh:生成Diffie-Hellman参数。

gen-req <filename_base> [ cmd-opts ]:生成证书签发请求文件(csr)。在生成证书之前,需要先生成证书请求文件来申请证书。该命令会使用指定的文件名作为基础名称,并生成带有后缀“.req”的文件。
sign-req <type> <filename_base>:签署证书请求文件,将其转换为可用的证书文件(.crt)。当签署客户端证书时,type应为client;签署服务器证书时,type应为server。需要提供签署者的ca.crt和ca.key文件,以及要签署的证书请求文件(.req)。

build-client-full <filename_base> [ cmd-opts ]:建立完整的客户端证书,包括公钥、私钥、证书文件(.crt)和加密密码。
build-server-full <filename_base> [ cmd-opts ]:建立完整的服务器证书,包括公钥、私钥、证书文件(.crt)和加密密码。

revoke <filename_base> [cmd-opts]:撤销指定的证书文件。需要提供要撤销的证书文件(.crt)以及签署者的ca.crt和ca.key文件。
renew <filename_base> [cmd-opts]:更新证书文件。在到期之前,可以使用该命令重新生成证书文件。需要提供要更新的证书文件(.crt)以及签署者的ca.crt和ca.key文件。

build-serverClient-full <filename_base> [ cmd-opts ]:建立带有客户端身份验证的服务器证书,包括公钥、私钥、证书文件(.crt)和加密密码。

gen-crl:生成证书吊销列表(CRL),包含已撤销的证书信息。
update-db:更新easyrsa工具的索引数据库,该数据库用于跟踪证书颁发机构、证书和吊销列表等信息。

show-req <filename_base> [ cmd-opts ]:显示证书请求文件的详细信息。
show-cert <filename_base> [ cmd-opts ]:显示证书文件的详细信息。
show-ca [ cmd-opts ]:显示CA的详细信息。

import-req <request_file_path> <short_basename>:导入证书请求文件。该命令可用于从外部源导入证书请求文件。

export-p7 <filename_base> [ cmd-opts ]:将证书和私钥以PKCS#7格式导出到指定的文件中。
export-p8 <filename_base> [ cmd-opts ]:将证书和私钥以PKCS#8格式导出到指定的文件中。
export-p12 <filename_base> [ cmd-opts ]:将证书和私钥以PKCS#12格式导出到指定的文件中。

set-rsa-pass <filename_base> [ cmd-opts ]:为RSA私钥设置密码。
set-ec-pass <filename_base> [ cmd-opts ]:为EC私钥设置密码。

upgrade <type>:升级证书,type可以是client或server。
服务端配置详解
# server.conf 文件中以#或;开头的行都为注释
~]#grep -Ev "^#|^$" /etc/openvpn/server.conf
;local a.b.c.d  #本机监听IP,默认为本机所有IP
port 1194       #端口
;proto tcp      #协议,生产推荐使用TCP
proto udp  #默认协议
;dev tap   #创建一个以太网隧道,以太网使用tap,一个tap设备允许完整的以太网帧通过Openvpn隧道,可提供非ip协议的支持,比如IPX协议和AppleTalk协议,tap等同于一个以太网设备,它操作第二层数据包如以太网数据帧。
dev tun    #创建一个路由IP隧道,生产推存使用tun.互联网使用tun,一个tun设备大多时候,被用于基于IP协议的通讯。tun模拟了网络层设备,操作第三层数据包比如IP数据封包。
;dev-node MyTap  #TAP-Win32适配器。非windows不需要配置
ca ca.crt       #ca证书文件
cert server.crt  #服务器证书文件
key server.key   #服务器私钥文件
dh dh2048.pem    #dh参数文件
;topology subnet
server 10.8.0.0 255.255.255.0  #客户端连接后分配IP的地址池,服务器默认会占用第一个IP 10.8.0.1将做为客户端的网关
ifconfig-pool-persist ipp.txt  #为客户端分配固定IP,不需要配置,建议注释
;server-bridge 10.8.0.4 255.255.255.0 10.8.0.50 10.8.0.100  #配置网桥模式,不需要配置,建议注释
;server-bridge
;push "route 192.168.10.0 255.255.255.0"  #给客户端生成的到达服务器后面网段的静态路由,下一跳为openvpn服务器的10.8.0.1
;push "route 192.168.20.0 255.255.255.0"  #推送路由信息到客户端,以允许客户端能够连接到服务器背后的其它私有子网
;client-config-dir ccd    #为指定的客户端添加路由,此路由通常是客户端后面的内网网段而不是服务端的,也不需要设置
;route 192.168.40.128 255.255.255.248
;client-config-dir ccd
;route 10.9.0.0 255.255.255.252
;learn-address ./script                   #运行外部脚本,创建不同组的iptables规则,无需配置
;push "redirect-gateway def1 bypass-dhcp" #启用后,客户端所有流量都将通过VPN服务器,因此生产一般无需配置此项
;push "dhcp-option DNS 208.67.222.222"    #推送DNS服务器,不需要配置
;push "dhcp-option DNS 208.67.220.220"
;client-to-client                       #允许不同的client直接通信,不安全,生产环境一般无需要配置
;duplicate-cn                           #多个用户共用一个证书,一般用于测试环境,生产环境都是一个用户一个证书,无需开启
keepalive 10 120    #设置服务端检测的间隔和超时时间,默认为每10秒ping一次,如果 120 秒没有回应则认为对方已经down
tls-auth ta.key 0   #访止DoS等攻击的安全增强配置,可以使用以下命令来生成:openvpn --genkey --secret ta.key #服务器和每个客户端都需要拥有该密钥的一个拷贝。第二个参数在服务器端应该为’0’,在客户端应该为’1’
cipher AES-256-CBC  #加密算法
;compress lz4-v2    #启用Openvpn2.4.X新版压缩算法
;push "compress lz4-v2"   #推送客户端使用新版压缩算法,和下面的comp-lzo不要同时使用
;comp-lzo           #旧户端兼容的压缩配置,需要客户端配置开启压缩,openvpn2.4.X等新版可以不用开启
;max-clients 100    #最大客户端数
;user nobody        #运行openvpn服务的用户和组
;group nobody
persist-key          #重启VPN服务时默认会重新读取key文件,开启此配置后保留使用第一次的key文件,生产环境无需开启
persist-tun          #启用此配置后,当重启vpn服务时,一直保持tun或者tap设备是up的,否则会先down然后再up,生产环境无需开启
status openvpn-status.log #openVPN状态记录文件,每分钟会记录一次
;log         openvpn.log  #第一种日志记录方式,并指定日志路径,log会在openvpn启动的时候清空日志文件,不建议使用
;log-append openvpn.log   #第二种日志记录方式,并指定日志路径,重启openvpn后在之前的日志后面追加新的日志,生产环境建议使用
verb 3                   #设置日志级别,0-9,级别越高记录的内容越详细,0 表示静默运行,只记录致命错误,4 表示合理的常规用法,5 和 6 可以帮助调试连接错误。9 表示极度冗余,输出非常详细的日志信息
;mute 20                 #相同类别的信息只有前20条会输出到日志文件中
explicit-exit-notify 1   #通知客户端,在服务端重启后自动重新连接,仅能用于udp模式,tcp模式不需要配置即可实现断开重新连接,且开启此项后tcp配置后将导致openvpn服务无法启动,所以tcp时必须不能开启此项
证书过期解决方法
如果服务端证书server.crt过期,可以使用req文件重新生成服务端证书,关键就在于req文件不能丢失,通常req文件位于 /etc/openvpn/server/easy-rsa/pki/reqs/ 目录。req文件也就是openssl中通常所说的的csr证书请求文件。
/etc/openvpn/server/easy-rsa/pki/reqs/server.req
重新生成服务端证书:
cd /etc/openvpn/server/easy-rsa/
./easyrsa sign server server
将证书放到配置文件指定的目录,重启openvpn服务,客户端重连即可。
提示:下面这两组命令等效
命令一:
./easyrsa build-server-full server nopass
命令二:
./easyrsa gen-req server nopass
./easyrsa sign server server
连接失败的常见原因
通知客户端在服务端重启后自动重新连接,只能在udp下配置此项,因为tcp有自动重连的功能。
explicit-exit-notify 1
压缩算法服务端和客户端不匹配:
如:服务端使用 compress lz4-v2 算法,那么客户端也要使用相同的算法 compress lz4-v2。
这种情况看上去是连上了其实没连上,错误日志中会有“ad LZO”提示。
工作模式必须相同:
vpn有两种工作模式:tun和tap都可以支持tcp和udp协议,如果服务端是dev tun,客户端也必须是dev tun,工作模式要相同。
每隔一段时间自动重连:
reneg-sec n,第二个参数是时间,单位秒,该参数默认值是3600秒,也就是默认1个小时openvpn就会重新协商一下数据通道key。
解决方法:
在openvpn服务端或者客户端任意一端配置文件中配置reneg-sec 0即可。
启用压缩出现告警:
compress lzo 启用压缩会出现警告,默认不支持压缩,会被利用破解加密,服务端和客户端都注释即可。
常见问题总结:
me.jinchuang.org/archives/573.html
监控openvpn
openvpn_exporter地址:
https://github.com/kumina/openvpn_exporter
没有二进制需要编译:
yum install go -y
解压编译:编译过程当中需要从github上下载包,所以根据网络情况可能需要配置代理。
tar -xf v0.3.0.tar.gz
cd openvpn_exporter-0.3.0/
go build -o openvpn_exporter main.go
mkdir /usr/local/openvpn_exporter/
mv openvpn_exporter /usr/local/openvpn_exporter/
openvpn_exporter是读取openvpn的状态文件来读取指标的,所以要配置openvpn状态文件的位置。在openvpn 的配置文件 /etc/openvpn/server/server.conf 如下指令是配置状态文件的。
status /var/log/openvpn/status.log
启动exporter:
./openvpn_exporter -openvpn.status_paths /var/log/openvpn/status.log &
创建systemd服务文件:
[Unit]
Description=Prometheus OpenVPN Node Exporter
Wants=network-online.target
After=network-online.target

[Service]
Type=simple
ExecStart=/usr/local/openvpn_exporter/openvpn_exporter -openvpn.status_paths /var/log/openvpn/status.log

Restart=on-failure
KillMode=process
RestartSec=10
[Install]
WantedBy=multi-user.target
开机启动:
systemctl start openvpn_exporter.service && systemctl status openvpn_exporter.service
导入面板:
https://grafana.com/grafana/dashboards/10562
打通两地网络:
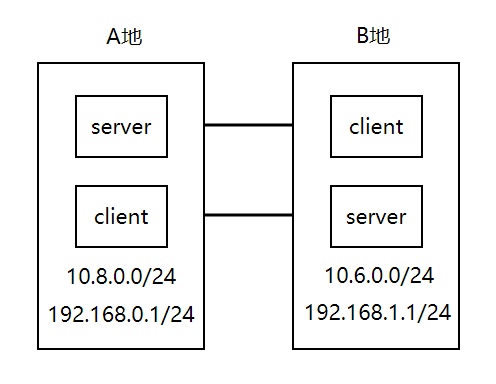
要打通两地网络openvpn的隧道网络的网段不能相同,如图的10.8.0.0/24 和 10.6.0.0/24。两地的局域网的网段也不能相同,如图的192.168.0.1/24 和 192.168.1.0/24。两地分别用自己的客户端连接对方的服端务,这样两地的网络就可以互通了。其他机器通过配置路由规则转发流量即可,或在路由器中配置静态路由。
注意:要在openvpn服务端所在的节点上也就是充当路由器的这个节点上加上源地址转换即:SNAT,原理就是nat上网方式。
iptables -t nat -A POSTROUTING -d 192.168.199.0/24 -o tun1 -j MASQUERADE
上面这条规则中tun1就是openvpn的网卡,连接网络的两端一头一个,也就是说通往另一头的流量必须从这个网卡出。
内网的机器要想通过nat方式上网必须要做源地址转换,参考如下:
blog.csdn.net/qq_44910432/article/details/89300784
这样其他机器将199网段的流量转发到192.168.0.9(openvpn)这个节点上即可,路由规则如下:
ip route add 192.168.199.0/24 via 192.168.0.9 dev eth0
如果可以修改路由器,可以在路由器上设置 192.168.199.0 网段的下一条指向 192.168.0.9 节点,这样就不用在每一个节点上设置路由了。